Are you ready to play LittleBigPlanet custom servers? This guide will show you how to complete the last step after patching: creating your account. Let’s dive in!
What is Beacon?
Beacon is LittleBigPlanet’s premiere custom server. Operated by LBP Union, Beacon has over 23,000 users and over 22,000 levels. We have curated team picks, regular contests, and a well moderated community that we’re excited for you to be a part of!
Have You Patched Yet?
This guide is for users who have already patched their game and are ready to connect to the server. To learn how to patch, please select a tutorial for your platform below. Please note that LBP Vita is not currently supported. We will support Vita once a critical security plugin is available.
Understanding the Accounts Involved
To play on Beacon custom servers for LittleBigPlanet, you need an account with us first. Think of this as your passport to playing LittleBigPlanet online. There are actually two accounts to consider here: your service account and your Beacon account.
- Your service account is your PlayStation Network (PS3 and Vita) or RPCN (RPCS3) account.
- Your Beacon account is your account that LBP Union hosts on Beacon and is where all the data that you upload to the server is associated with.
This guide will show you how to create your Beacon account, not your service account. Learn how to create a service account via the buttons below.
How Does It Work?
When you connect to Beacon, you’ll be logged in to a service account as described above. This will send a request to our server with your username. If you have a registered Beacon account that matches that username and that platform is linked, you’ll be able to connect!
LBP Union and Beacon do not gain any access to your PlayStation Network or RPCN account in this way. This process is purely for identification and authentication. The only information we obtain is what you choose to upload to the server.
Creating Your Beacon Account
Now to the real meat and potatoes. To create your Beacon account, follow these steps:
- Visit the Beacon Registration page in your web browser.
- Type your username for your service account in the box. Ensure that it is spelled exactly the same way as your service account, or you will not be able to connect to the server!
- Fill out the rest of the form. You will need a strong password and an email address.
- Complete the Captcha and click Register.
- If you typed your email correctly, you will receive an email with your verification link. You must verify your email to finish registration.
- Once you have verified your email, you must set up dual factor authentication (2FA). More on that later.

Once you’ve completed these steps, you’ll be ready to connect your game to the server!
Verify Your Email
![A screenshot of the Beacon email verification page. Verify email address An email address on your account has been set, but hasn't been verified yet. To verify it, check the email sent to [redacted] and click the link in the email. A button says resend email.](https://www.lbpunion.com/wp-content/uploads/2025/08/Verify-Email.png)
After you click Register, you should now see the above screen titled ‘Verify Email Address’. This informs you that an email address was set to your account, but it hasn’t been verified yet. You will need to verify your email address to continue.
Head over to your email’s inbox. If all went as planned, you should see the following email:

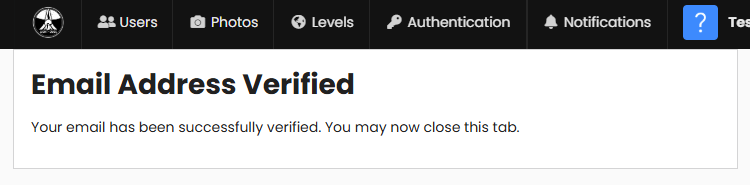
Click the link in the email. Do not share this with others. This will verify your email address. If successful you will see the following message on the Beacon website:
Set Two-Factor Authentication
All users with Beacon accounts are required to set up Two-Factor Authentication (2FA). This is a secondary security measure that will help protect your account in case your password is exposed. Your ‘second factor’ of authentication, typically your phone, will be required in addition to your password when signing in. Here’s how to set up 2FA step by step:
- Choose a two-factor authentication application. Ideally you should select a single device, like a mobile phone, that you take with you everywhere. There are many 2FA apps available, like Google Authenticator, that can be used for this purpose.
- You’ll be presented with a QR code. Scan the code with your phone’s 2FA app. Alternatively, copy the 2FA secret code below the QR code and paste it into the 2FA application of your choice.
- The app will now generate a set of time-based codes every so often that you can use to sign into Beacon. Beacon will require you to enter one now to verify that you set it up correctly.
- Choose a SEPARATE place other than your 2FA device to write down your backup codes.

Once you scan the QR code, you’ll see a time-based code appear in the app. Type or copy this code into the boxes at the bottom of the webpage on Beacon to verify that you’ve set up 2FA correctly. If it’s the right code, you’re ready to move on to the next step.
For Advanced Users…
If you can’t use the QR code or if you’re setting up 2FA with a device that doesn’t have a camera, you can click Copy secret code. This copies all the data from the QR code to your clipboard for you to paste into the application.
Backup Codes: Write Them Down!

Your backup codes are extremely important to ensure that you don’t lose access to your Beacon account from the website. If you set up 2FA correctly, you will be presented with the screen above. These are a set of numbers and letters that will allow you to regain access to your account if you ever lose the device where your 2FA app is kept. These codes will not be shown again after you exit this page!
It’s very important that you not keep these codes on the same device as your 2FA app. Our recommendation is to write them down on a piece of paper and keep it in a safe place. If you lose the device your app is stored on and you keep the backup codes there, the backup codes are useless. If you lose both your device and your backup codes, you will need to get in touch with us on our Discord server’s ticket system (the #help channel) or contact us to start the process of resetting your 2FA.
Linking Your Account
Now that you’ve created a Beacon account, it’s time to link your Beacon account and service accounts together. This is necessary so that dastardly copycats don’t try to impersonate you. You will need to be logged into the Beacon website to do this.
Head over to your game of choice and ensure you are logged in with the correct service account. Remember, this account’s username must match the name of the Beacon account you created. If you type the account name wrong when creating your Beacon account, you can either create a new account or contact us to help you get the account renamed.
Approving Your Authentication Request
When you attempt to connect to the server, even if you are correctly patched, you will get a 403 error. This is normal. Do it anyway! If you are correctly patched, have a Beacon account, and attempt to connect to the server, this will generate an authentication request on the website which you must approve. Here’s how:
- While correctly patched, attempt to connect to Beacon by booting the game.
- You will get a 403 error. This is normal.
- Head over to the Beacon authentication page.
- You will see a authentication request. Make sure it’s something you expect, and then click Approve.
- Your accounts will now be linked! Attempt to connect to the server again from the game and see if it connects.

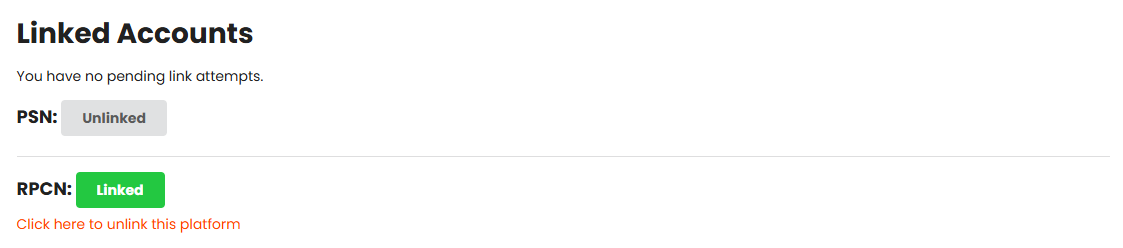
When you have approved a link request, you’ll see it appear on the Authentication tab like in the example below:
Did You Know?
If your PlayStation Network and RPCN accounts have the exact same name, you can link them both to your Beacon account at the same time? You can use the Authentication tab on the Beacon website to do this by approving the connection requests! Once you have approved the requests, you won’t need to do this step again.
It’s Time to Hop On!
Once you have created your Beacon account and linked it to your PlayStation Network or RPCN account, you’re ready to play on Beacon! Need help? Join our Discord server and head over to the #beacon-support forum channel to ask questions and find others with similar problems. Thank you for playing on Beacon!